
Post by admin on Mar 15, 2006 8:59:22 GMT -5
Originally posted by TJ/bassrod2
Tuesday, March 14th 2006
6:27 PM
TEMPTING TASTE OF FISH
FISHING JOURNAL
The Tempting Taste of Fish
Go and grab an apron - Fish Cooking 101 is about to begin.
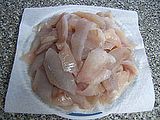
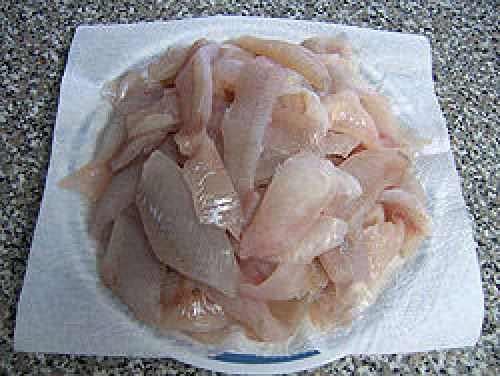
A mess of these can quickly turn into a delicious meal for the whole family.

Click on image for larger pic
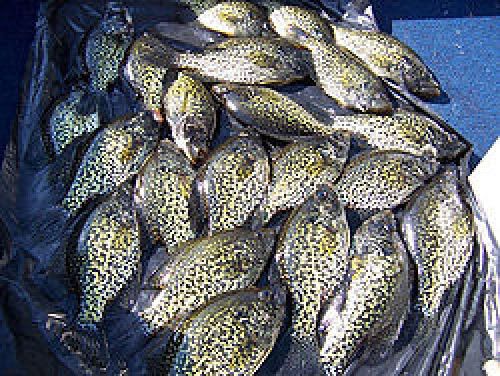
If there's one thing I've discovered after spending all these years out on the water, it's that fresh fish sure tastes good. No matter what species it is, be it bass, walleye or crappie, the tempting aroma and mouth-watering flavor they exhibit might be the closest thing to pure perfection that I can think of.
Even though I release the majority of fish that are unlucky enough to strike my lure, I believe that bringing one or two home for the dinner table is a right of passage that should be embraced by everyone that chooses to cast a line. (Knowing what to do with your catch, whether that means filleting, freezing or preparing, will be your ultimate recipe and test for success.) So go and grab an apron - Fish Cooking 101 is about to begin.
The Initial Catch
If your skill and tactics are up to snuff for catching a fish for the table (which I'm sure all of the Bass Pro Shops readers are!), then a plan and strategy must be worked out from the minute your hook is removed from its yap. Firstly, be extra careful when handling your catch. Dropping your fish to the floor, or allowing it to flop around at your feet will do nothing but bruise the flesh - a definite route on the way to poor quality. Keep handling to a minimum, and if possible, use a net to make the landing quick and effortlessly.
Once in the boat, your main objective is to keep your quarry alive. Livewells are a great feature for accomplishing this task, and your fish friend will continue to swim and breathe until you get back to the dock or your doorstep. If a livewell isn't available, a stringer tied to the side of the boat is your next best bet. Make sure the fish have plenty of leeway in the rope, and that they are not thrashing against one another, or the side of the boat. Keeping your catch alive will ensure optimum freshness and firm flesh - the necessary ingredients for a top-notch dinner.
If you don't have a livewell or stringer at your disposal, your only option is to immediately kill your catch. Filleting or gutting the fish will ensure that the meat doesn't spoil, or get contaminated from the body fluids. Once prepared in this manner, the fish should be placed on ice (and covered over), and put into a tightly sealed cooler. This will help in preserving the meat until you make it back to the kitchen.
For most fish I cook filleting is my method of choice.
Preparation is Key
Click on image for larger pic
If you've kept your fish alive up to this point, it's now time to get out the fillet knife. For best results, choose a knife that sports a thin, flexible blade. (This will allow better maneuverability for maximizing the most meat.)
And even though it's common sense, an ultra sharp blade is a necessity. I always have on hand a filing stone or knife sharpener, in order to give the metal a quick touch up before each "operation" takes place.
For most fish I cook, including bass, walleye, perch and crappie, filleting is my method of choice. (I won't go into detail on the precise instruction, although information can be found quite easily throughout the worldwide web.) Filleting is quite simple once you get the hang of it, and like most things in life, practice certainly makes perfect.
For small trout, gutting the fish is often the preferred choice. This process involves cutting the head and tail off, while scraping out the gut and innards from the belly section. (Many also remove the backbone fat due to possible contaminants being stored there.)
Lastly for larger fish species, especially salmon and trout, cutting the meat into steaks will get the job done nicely.
No matter what method you decide upon, the next step in the process is the most crucial for prolonging the life of the meat.
The Deep Freeze
Unless you are going to eat your fish immediately, storing it in your freezer is the only viable option for saving it for a rainy day. How you choose to store it; however, will either make or break the taste and quality. (The two common problems with frozen seafood is the development of off-flavors due to the oxidation of tissue lipids, and freezer burn, which is caused by moisture loss.)
Here is a guide showing the approximate storage life for the common species of fish kept:
Species Months of Storage
Lake trout, rainbow trout, whitefish, carp, catfish, lake herring, smelt, northern pike 3-5
Chinook salmon, coho salmon, white bass, sucker,
Burbot 5-8
Walleye, yellow perch, bass, crappie, bluegill 8-12
Once your fish is fully cleaned and prepared, thoroughly wash the meat in cold water. After this stage is complete, it's now time to choose a freezing method from one on the list below.
Vacuum packaging is the most efficient way to store fish for the freezer.
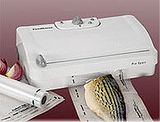
Click on image for larger pic
Vacuum Packaging -- This is the most effective method for protecting fish against the two types of problems associated with freezing fish - oxidation and freezer burn. Although this system can be pricey, the rewards are well worth the initial cost of the unit and the accompanying oxygen-barrier film bags.
A vacuum unit literally sucks the air out of the bag containing the fish, leaving a tight, sealed package. With the absence of air, most problems associated with freezing are diminished or eliminated.
Plastic Wrap -- The second best choice when it comes to freezing is the common plastic wrap. In order for this method to work, apply the plastic as tightly as possible to the fish. (This will form a moisture barrier that will greatly reduce the chance for freezer burn.)
Once wrapped with the cling-tight plastic, wrap the package again with several layers of butcher paper or aluminum foil for full protection qualities.
Freezer Bags -- Freezer bags are a common and popular choice for the fishing enthusiast, and are quite effective when used properly.
When placing fish into bags, the most common problem encountered is trying to remove all of the air. A handy trick to try is to insert a straw into the opening at the top, and literally suck the oxygen out. Another tip to try is to freeze the package for a few days, then re-open the bag and add a little cold water, manipulating it throughout to cover all areas of the fish while eliminating air pockets. It can now be put back into the freezer for storage.
Thaw Time
Once you have decided it is time to have a feed of fish, thawing your package before cooking is the route to take. The preferred method is to place the package directly in the refrigerator, which should take approximately a day for a pound in weight.
If time is of the essence, placing the freezer bag in a tub of cold water is a great technique. (Depending on thickness and weight, an average package should take 1-2 hours before it is complete.)
There are literally thousands of recipes and methods for cooking fish.
The microwave is the fastest method available, but one to be careful with. Always set the oven to defrost, and monitor closely for readiness. Placing the frozen fish in a closed package, glass baking dish or loosely wrapped in waxed paper will help the process along. It is imperative that you only partially defrost the fish, as microwaving it too long will ultimately cook the outer edges.
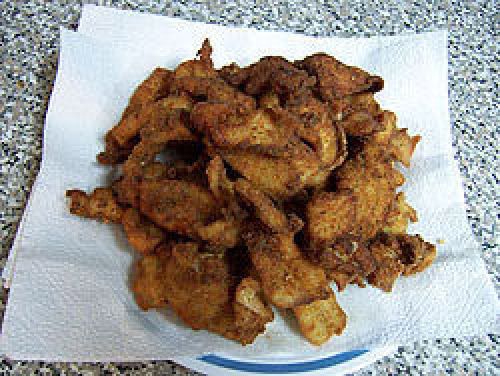
The Finished Product
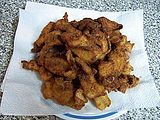
Click on image for larger pic
You've finally reached the stage where it's time to actually cook the fish. Congratulations!! There are literally thousands of recipes and methods for cooking fish, and with so many options, the variety of delicious meals you can serve up is limitless. Here is one of my favorite recipes - it's simple to do and I promise you that it will melt in your mouth!
Justin's Foiled Fish
1. Select fillets from your favorite specie of fish. I've found that bass and walleye work well.
2. Cut fillets into four to five-inch pieces, and place onto flat sheet of tin foil. I use five or six fillets for each tin foil sheet.
3. Place a tablespoon of butter or margarine on top of fillets.
4. Sprinkle a thin layer of commercial fish batter on top of the fillets. (I've found that Fish Crisp works well.)
5. Place assorted spices on top of fish, including Montreal Smoked Meat and Lemon and Garlic. Add a dash of salt and pepper for seasoning.
6. Squeeze a splash of fresh lemon across the fish.
7. Wrap fish up in tin foil, leaving no openings in package.
8. Place on BBQ over medium heat, turning every few minutes.
9. Cook for 10 minutes and enjoy.
Easy Recipes for Tasty Treats
Here are a few more recipes that are simple and delicious. Try one out the next time you bring a fish home for dinner!
Skin-on Grilled Salmon Fillets
1. Preheat grill to medium heat and brush grate with oil.
2. Cut salmon fillet into pieces 2-inches wide, leaving the skin on.
3. Brush the skin side with oil, and salt and pepper both sides.
4. Place the salmon skin-side down on grill.
5. Coat the top side of each piece with dressing.
6. Cover the grill.
7. Cook for 12-15 minutes until the skin is crisp and the fish is done.
Dressing
1 Cup of mayonnaise
1/2 Cup of Dijon-style mustard
1 Tablespoon of dill weed
Salt and pepper to taste
Broiled Bass Fillets
1. Preheat oven to 450.
2. Coat bass fillets with melted butter and place on a non-stick broiler pan.
3. Sprinkle fish evenly with lemon pepper and cayenne pepper.
4. Place thinly sliced onion rings on the fillets.
5. Bake for 8 minutes on oven rack and then turn broiler on at 50U for 3-6 minutes to brown the top.
6. Remove and serve with lemon.
Mushroom Cheddar Baked Walleye (Serves 4)
1-lb. Walleye Fillets (4)
1/4 tsp. Salt
1/4 tsp. Pepper
Pinch of Nutmeg
1 can Cream of Mushroom Soup
1/4 cup White Wine
1/2 tsp. Tarragon
1/4 cup Heavy Cream
1 cup Grated Cheddar Cheese
1. Pre-heat oven to 350 degrees.
2. Place fillets in an 8" by 8" pan.
3. Mix together salt, pepper and nutmeg.
4. Sprinkle mixture over fish.
5. Combine soup, cream, wine and tarragon.
6. Spread over fish and cover with grated cheese.
7. Bake uncovered for 30 minutes or until fish flakes easily with a fork.
ENJOY THE OUTDOORS,
TJ
Tuesday, March 14th 2006
6:27 PM
TEMPTING TASTE OF FISH
FISHING JOURNAL
The Tempting Taste of Fish
Go and grab an apron - Fish Cooking 101 is about to begin.
A mess of these can quickly turn into a delicious meal for the whole family.
Click on image for larger pic
If there's one thing I've discovered after spending all these years out on the water, it's that fresh fish sure tastes good. No matter what species it is, be it bass, walleye or crappie, the tempting aroma and mouth-watering flavor they exhibit might be the closest thing to pure perfection that I can think of.
Even though I release the majority of fish that are unlucky enough to strike my lure, I believe that bringing one or two home for the dinner table is a right of passage that should be embraced by everyone that chooses to cast a line. (Knowing what to do with your catch, whether that means filleting, freezing or preparing, will be your ultimate recipe and test for success.) So go and grab an apron - Fish Cooking 101 is about to begin.
The Initial Catch
If your skill and tactics are up to snuff for catching a fish for the table (which I'm sure all of the Bass Pro Shops readers are!), then a plan and strategy must be worked out from the minute your hook is removed from its yap. Firstly, be extra careful when handling your catch. Dropping your fish to the floor, or allowing it to flop around at your feet will do nothing but bruise the flesh - a definite route on the way to poor quality. Keep handling to a minimum, and if possible, use a net to make the landing quick and effortlessly.
Once in the boat, your main objective is to keep your quarry alive. Livewells are a great feature for accomplishing this task, and your fish friend will continue to swim and breathe until you get back to the dock or your doorstep. If a livewell isn't available, a stringer tied to the side of the boat is your next best bet. Make sure the fish have plenty of leeway in the rope, and that they are not thrashing against one another, or the side of the boat. Keeping your catch alive will ensure optimum freshness and firm flesh - the necessary ingredients for a top-notch dinner.
If you don't have a livewell or stringer at your disposal, your only option is to immediately kill your catch. Filleting or gutting the fish will ensure that the meat doesn't spoil, or get contaminated from the body fluids. Once prepared in this manner, the fish should be placed on ice (and covered over), and put into a tightly sealed cooler. This will help in preserving the meat until you make it back to the kitchen.
For most fish I cook filleting is my method of choice.
Preparation is Key
Click on image for larger pic
If you've kept your fish alive up to this point, it's now time to get out the fillet knife. For best results, choose a knife that sports a thin, flexible blade. (This will allow better maneuverability for maximizing the most meat.)
And even though it's common sense, an ultra sharp blade is a necessity. I always have on hand a filing stone or knife sharpener, in order to give the metal a quick touch up before each "operation" takes place.
For most fish I cook, including bass, walleye, perch and crappie, filleting is my method of choice. (I won't go into detail on the precise instruction, although information can be found quite easily throughout the worldwide web.) Filleting is quite simple once you get the hang of it, and like most things in life, practice certainly makes perfect.
For small trout, gutting the fish is often the preferred choice. This process involves cutting the head and tail off, while scraping out the gut and innards from the belly section. (Many also remove the backbone fat due to possible contaminants being stored there.)
Lastly for larger fish species, especially salmon and trout, cutting the meat into steaks will get the job done nicely.
No matter what method you decide upon, the next step in the process is the most crucial for prolonging the life of the meat.
The Deep Freeze
Unless you are going to eat your fish immediately, storing it in your freezer is the only viable option for saving it for a rainy day. How you choose to store it; however, will either make or break the taste and quality. (The two common problems with frozen seafood is the development of off-flavors due to the oxidation of tissue lipids, and freezer burn, which is caused by moisture loss.)
Here is a guide showing the approximate storage life for the common species of fish kept:
Species Months of Storage
Lake trout, rainbow trout, whitefish, carp, catfish, lake herring, smelt, northern pike 3-5
Chinook salmon, coho salmon, white bass, sucker,
Burbot 5-8
Walleye, yellow perch, bass, crappie, bluegill 8-12
Once your fish is fully cleaned and prepared, thoroughly wash the meat in cold water. After this stage is complete, it's now time to choose a freezing method from one on the list below.
Vacuum packaging is the most efficient way to store fish for the freezer.

Click on image for larger pic
Vacuum Packaging -- This is the most effective method for protecting fish against the two types of problems associated with freezing fish - oxidation and freezer burn. Although this system can be pricey, the rewards are well worth the initial cost of the unit and the accompanying oxygen-barrier film bags.
A vacuum unit literally sucks the air out of the bag containing the fish, leaving a tight, sealed package. With the absence of air, most problems associated with freezing are diminished or eliminated.
Plastic Wrap -- The second best choice when it comes to freezing is the common plastic wrap. In order for this method to work, apply the plastic as tightly as possible to the fish. (This will form a moisture barrier that will greatly reduce the chance for freezer burn.)
Once wrapped with the cling-tight plastic, wrap the package again with several layers of butcher paper or aluminum foil for full protection qualities.
Freezer Bags -- Freezer bags are a common and popular choice for the fishing enthusiast, and are quite effective when used properly.
When placing fish into bags, the most common problem encountered is trying to remove all of the air. A handy trick to try is to insert a straw into the opening at the top, and literally suck the oxygen out. Another tip to try is to freeze the package for a few days, then re-open the bag and add a little cold water, manipulating it throughout to cover all areas of the fish while eliminating air pockets. It can now be put back into the freezer for storage.
Thaw Time
Once you have decided it is time to have a feed of fish, thawing your package before cooking is the route to take. The preferred method is to place the package directly in the refrigerator, which should take approximately a day for a pound in weight.
If time is of the essence, placing the freezer bag in a tub of cold water is a great technique. (Depending on thickness and weight, an average package should take 1-2 hours before it is complete.)
There are literally thousands of recipes and methods for cooking fish.
The microwave is the fastest method available, but one to be careful with. Always set the oven to defrost, and monitor closely for readiness. Placing the frozen fish in a closed package, glass baking dish or loosely wrapped in waxed paper will help the process along. It is imperative that you only partially defrost the fish, as microwaving it too long will ultimately cook the outer edges.
The Finished Product
Click on image for larger pic
You've finally reached the stage where it's time to actually cook the fish. Congratulations!! There are literally thousands of recipes and methods for cooking fish, and with so many options, the variety of delicious meals you can serve up is limitless. Here is one of my favorite recipes - it's simple to do and I promise you that it will melt in your mouth!
Justin's Foiled Fish
1. Select fillets from your favorite specie of fish. I've found that bass and walleye work well.
2. Cut fillets into four to five-inch pieces, and place onto flat sheet of tin foil. I use five or six fillets for each tin foil sheet.
3. Place a tablespoon of butter or margarine on top of fillets.
4. Sprinkle a thin layer of commercial fish batter on top of the fillets. (I've found that Fish Crisp works well.)
5. Place assorted spices on top of fish, including Montreal Smoked Meat and Lemon and Garlic. Add a dash of salt and pepper for seasoning.
6. Squeeze a splash of fresh lemon across the fish.
7. Wrap fish up in tin foil, leaving no openings in package.
8. Place on BBQ over medium heat, turning every few minutes.
9. Cook for 10 minutes and enjoy.
Easy Recipes for Tasty Treats
Here are a few more recipes that are simple and delicious. Try one out the next time you bring a fish home for dinner!
Skin-on Grilled Salmon Fillets
1. Preheat grill to medium heat and brush grate with oil.
2. Cut salmon fillet into pieces 2-inches wide, leaving the skin on.
3. Brush the skin side with oil, and salt and pepper both sides.
4. Place the salmon skin-side down on grill.
5. Coat the top side of each piece with dressing.
6. Cover the grill.
7. Cook for 12-15 minutes until the skin is crisp and the fish is done.
Dressing
1 Cup of mayonnaise
1/2 Cup of Dijon-style mustard
1 Tablespoon of dill weed
Salt and pepper to taste
Broiled Bass Fillets
1. Preheat oven to 450.
2. Coat bass fillets with melted butter and place on a non-stick broiler pan.
3. Sprinkle fish evenly with lemon pepper and cayenne pepper.
4. Place thinly sliced onion rings on the fillets.
5. Bake for 8 minutes on oven rack and then turn broiler on at 50U for 3-6 minutes to brown the top.
6. Remove and serve with lemon.
Mushroom Cheddar Baked Walleye (Serves 4)
1-lb. Walleye Fillets (4)
1/4 tsp. Salt
1/4 tsp. Pepper
Pinch of Nutmeg
1 can Cream of Mushroom Soup
1/4 cup White Wine
1/2 tsp. Tarragon
1/4 cup Heavy Cream
1 cup Grated Cheddar Cheese
1. Pre-heat oven to 350 degrees.
2. Place fillets in an 8" by 8" pan.
3. Mix together salt, pepper and nutmeg.
4. Sprinkle mixture over fish.
5. Combine soup, cream, wine and tarragon.
6. Spread over fish and cover with grated cheese.
7. Bake uncovered for 30 minutes or until fish flakes easily with a fork.
ENJOY THE OUTDOORS,
TJ


 ;D
;D